Mechanical Engineer, Manufacturing Engineer
Jason Moore
Carbon Fiber Clip


This was a project for my plastics and composites class and the main objective was to become more familiarized with carbon fiber and the process of layup to see what it takes to produce a carbon fiber part. For my clip I used only carbon fiber and a resin with a catalyst. I didn’t use any filler like honeycomb because it just wasn’t applicable for this process. Another objective for my individual project was to produce a functional clip. I was already interested in producing something using a carbon fiber material and I wanted to do something that was somewhat useful.
The first step was to make a strong enough mold for the part. There were two obstacles which were the shape of the mold and the material I was going to use for the mold. I ended up cutting a rectangular piece of plastic and heating it up to between 250-300 degrees F. At this temperature the plastic became workable and I was able to bend it into the general shape I wanted.
Plaster of paris was used to fill in the gaps and make the final shape. Once the plaster had hardened the entire mold was wrapped in a clear tape to make the mold as smooth as possible. This was done to make the seperation process easier. To aid this effort I applied a mold releasing agent on top of the tape although you can’t see it in the picture.
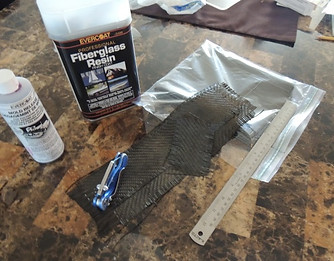
After completing the mold the next step was to gather the materials and supplies I would need to complete the operation. This included a fiberglass resin with harderner, mold release agent, peel ply material and carbon fiber fabric with a twill weave.To prep the carbon fiber I cut it into rectangles long enough to wrap around the mold. To start my actual layup, I first put down a layer of peel ply followed by a piece of fabric on top of that then a layer of resin. After applying four layers of carbon fiber and resin, they were wrapped around the mold leaving the peel ply on the outside. The purpose of the peel ply was to prevent the material from sticking to vaccum bag. From there I quickly moved the mold to a vacuum bag and turned on the vacuum. Since it was a vacuum sealer, the bag was sealed to keep the vacuum until the material had hardened.
The resin only took a few hours to fully harden and after it did the part was removed from the bag. Thanks to the peel ply, there weren't any issues with the resin sticking, however, during the vacuum process some of the fibers were pulled out of the weave and there were some rinkles that formed in the material. The clear material around the part is the excess resin that was pulled out of the part when the vacuum was applied. From this point the only thing left was to free the part from the mold and cut it to the final shape and round the edges. The mold actually came out of the part rather quickly and required little effort due the releasing agent that was previously applied.